Tuesday, November 18, 2014

Friday, November 7, 2014
Mastering Porky
I'm putting this same post on my newer blog, but since its so relevant to what John K teaches, I'll also put it here.
For the past 2 or more weeks, I have been working on mastering porky. Through copying, drawing from memory and invention (with reference, but it fluctuates how much I use it).
Through this I was able to create the following invented poses:


).jpg)



For the past 2 or more weeks, I have been working on mastering porky. Through copying, drawing from memory and invention (with reference, but it fluctuates how much I use it).
Through this I was able to create the following invented poses:
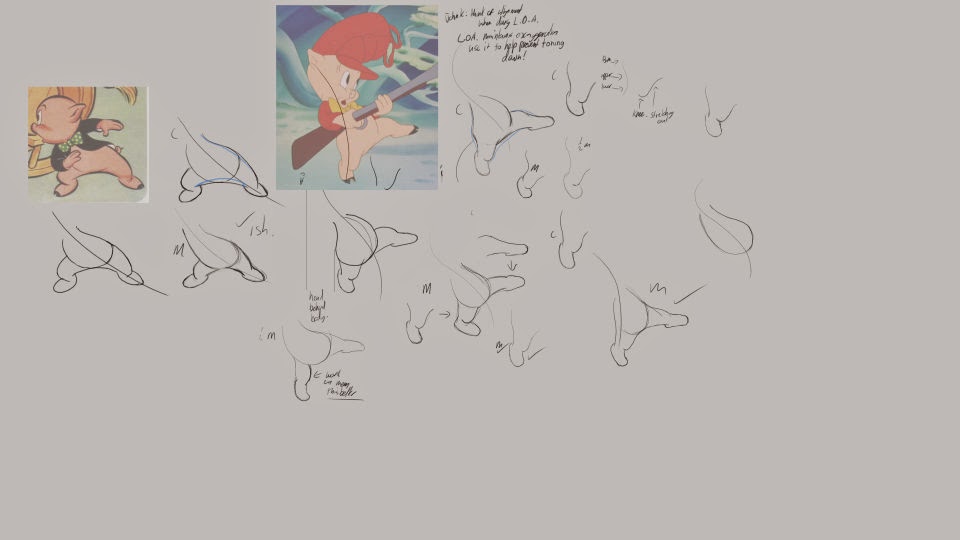
These first two used the above frames from Clampett's Porky in Wackyland as a reference. The rest used a model sheet I made from a variety of 1940s Clampett and Jones frames (posted further below).
These last two I am not so happy with, but I am still learning and don't fully understand how to pose porky in every way, so this still happens a bit. My proportions still vary quite a bit in general etc.
Here's the 2nd reference sheet I made:
And here are some of the sketches from my copying / understanding memory work. I like the last one especially (I should go back and do some memory work on that). A lot of the work below was about memorizing and understand the feet.
It would probably be a great idea to continue this process. I'm sure it could lead to really mastering porky, where I could invent poses and expressions for him from imagination without references and with correct proportions, construction hierarchy and strong poses.
However, right now I am going to move over to doing the same process with Elmer Fudd and later maybe some other simple generic characters. It should all lead to the same goal of being able to create and successfully pose from imagination. I might return to porky later, or just invent a new porky every day. I dunno.
I also should read and practice up on how to pose well ( I have a lot of books etc that address this)
Also on the cards is inventing and posing my own characters etc (hopefully incorporating these design principles).
I've done a bunch of art stuff that I haven't posted about, including drawing courses and making some of my own comics (not this cartoony though (yet)). This just felt so relevant to the John K training and suggestions that I had to post it.
Its interesting to see what happened to the people that posted work on John K's blog years back. Some became super good and went on to kick ass with their own inventions (I think Geneva was one of them). That is really inspiring to see. Many just seemed just to peter out (to be expected). I hope this shows I'm still chugging along (although with a few detours to be sure).
Cheers.
Sunday, January 27, 2013
Friday, October 22, 2010
Colour Matching
I Thought my colours on my last cartoon were pretty flat, so I've tried matching some colours from an old elmer fudd to see if my ink and colour would look as good or give it some depth. I'm quite happy with the result even though the colours aren't quite the same....


Thursday, October 21, 2010

Thursday, May 6, 2010
Friday, February 26, 2010

Thursday, February 25, 2010
More composition Studies

Framing, Staging, Space and Balance
F:
-loza -ve space
-mountain takes aways some excess space
St
-clear silhouette
-small characters grouped
Sp
-detailed chars, spacy mouth and -ve space
B
-no symmetry
-mountain and floor avoid framing symmetry

F:
-draws attention to two main chars
-floor intersects
St
-both chars with clear silhouettes and lines of action
Sp
-space around characters while framing objects are detailed
B
-no symmetry

F:
-great fireplace framing of chars, which intersects two main chars
St
-opposing lines of action
-background chars clumped with chair
Sp
-loza space on floor and wall (surrounding chars)
B
-uneven fireplace perspective

F:
-two side chars frame main char
- right intersects with main
- crowd perspective line intersection
St
-all chars clear silhouettes, loza c curves
- background objects and chars clumped
Sp
-some -ve space around foreground chars and pitcher
B
-character is not completely centred


Wednesday, February 24, 2010
Composition Anaysis
Here are some composition studies. Pics from this post.

Framing:
-All large shapes frame around the dolls
- intersection between side and top object and behind middle doll
Staging:
- dolls have clear silhouettes and are grouped
Space:
- neg space around and within dolls
Balance:
- two outside dolls not symmetrical
- display not centered

Framing
- foreground detail creates a clear space to frame the character
Staging
- foreground has a nice hierachy of shapes (dolls, table etc)
Space
- background very light and undetailed
Balance
- framing space has nice unsymmetrical shape

F:
- background intersects doll pleasingly
- lady helps to frame doll
St:
-clear silhouettes
-opposing poses
Sp:
- lots of -ve space between the doll, curtain and lady
- no detail on table or floor, spaced detil on cabinets
B:
- doll center of picture, but uncentered framing
More later.
Tuesday, February 23, 2010
composition Drawings
I tried some composition drawings (1st level construction only) in an attempt to sharpen my eye. Some mistakes. Here they are:


from these posts:
http://johnkstuff.blogspot.com/2009/05/good-compositions-take-self-control.html
http://johnkstuff.blogspot.com/2009/08/hierarchy-and-composition-try-drawing.html


from these posts:
http://johnkstuff.blogspot.com/2009/05/good-compositions-take-self-control.html
http://johnkstuff.blogspot.com/2009/08/hierarchy-and-composition-try-drawing.html


Composition Summary
Here is my summary of the composition tools John K shares in his composition manual (you can get it from his composition posts)

Basically it breaks down to four simple ideas (summarized at the bottom of the page). I'm going to use this info over the next few weeks to analyse a bunch of compositions, so stay tuned (;

Basically it breaks down to four simple ideas (summarized at the bottom of the page). I'm going to use this info over the next few weeks to analyse a bunch of compositions, so stay tuned (;
Monday, February 22, 2010


Friday, February 12, 2010
Porky 2
A bit better, the body was too small and the eyes (head) was a bit further to the right. The curve on the left side of the head is a lot steeper. No more overlays today.


Porky Copy
Not so accurate with this one. It'd be nice to do one copy overlay a day (with a redo if inaccurate occasionally). Maybe when I come back from Florence.


Thursday, February 11, 2010

Copy, Analyse and APPLY megapost
The path to improvement is clear. It is copy analyse and apply. I've learnt lot from John's Animation school lessons (construction, line of action, proportions, silhouettes, hierachy, overlay checks and more). I understand it all intelectually, but that doesn't count for squat!
What matters is being able to do. To do you must copy analyse and apply. This is what John K's Lesson 9 is all about.
It doesn't literally mean just copy all these model sheets (although that's a great idea)and then your done. What it's really saying is keep copying analysing and applying from great drawings (and sometimes life) all the time, as a training. The more you do, and the longer you have been doing them for, the better off you'll be.
Most people (including myself) forget about the apply part. This is really stupid. You will not much apart from how to copy unless you keep practicing how to apply. I think the best ratio is about 50:50, or one applied drawing for every analysed/copied drawing (maybe a bit more copying at the beginning is ok). It doesn't matter if the applied drawings really suck to begin with, this is part of the process.
Here are some of the applying exercises I do:
1) Change the pose/angle of the character.
2) design a new character (using similar features?)
3) Adopt the same pose with another existing character
4) Draw from memory
There are probably many other variations on this also (maybe some involving a storyline). Experiment!
Anyway, below (and in the post before) are some pages from my sketchbooks that I havent posted yet. Some are applied pictures and many suck. That's ok because it's part of the process.
Soon I will be working through the composition lessons (with the same process) :)
Yes, I will do more overlay checks. It's quite time consuming though (scanning software analysing reworking etc). Great for checking blind spots.


Subscribe to:
Posts (Atom)